For the past several years, the engineering community has attempted to control autonomous AI agents using prompt engineering. We write long instructions telling…
For the past several years, the engineering community has attempted to control autonomous AI agents using prompt engineering. We write long instructions telling coding agents to "always write secure code," "never modify the production config file," or "always run unit tests before submitting a pull request." We add warnings, highlight rules in markdown tables, and feed system prompts with dozens of rules.
Yet, anyone who has deployed coding agents in production knows this approach fails at scale. Prompt instructions are probabilistic. Under load, or when faced with complex code, LLMs experience "instruction drift" or hallucination. A coding agent might read a system prompt, understand the rules, and still overwrite a database credentials block because the model's attention span was overwhelmed by a large code diff.
Trying to secure and guide an agent purely through prompt instructions is like trying to secure a web application by asking users politely not to input SQL injection payloads. It is a fundamental violation of software engineering principles.
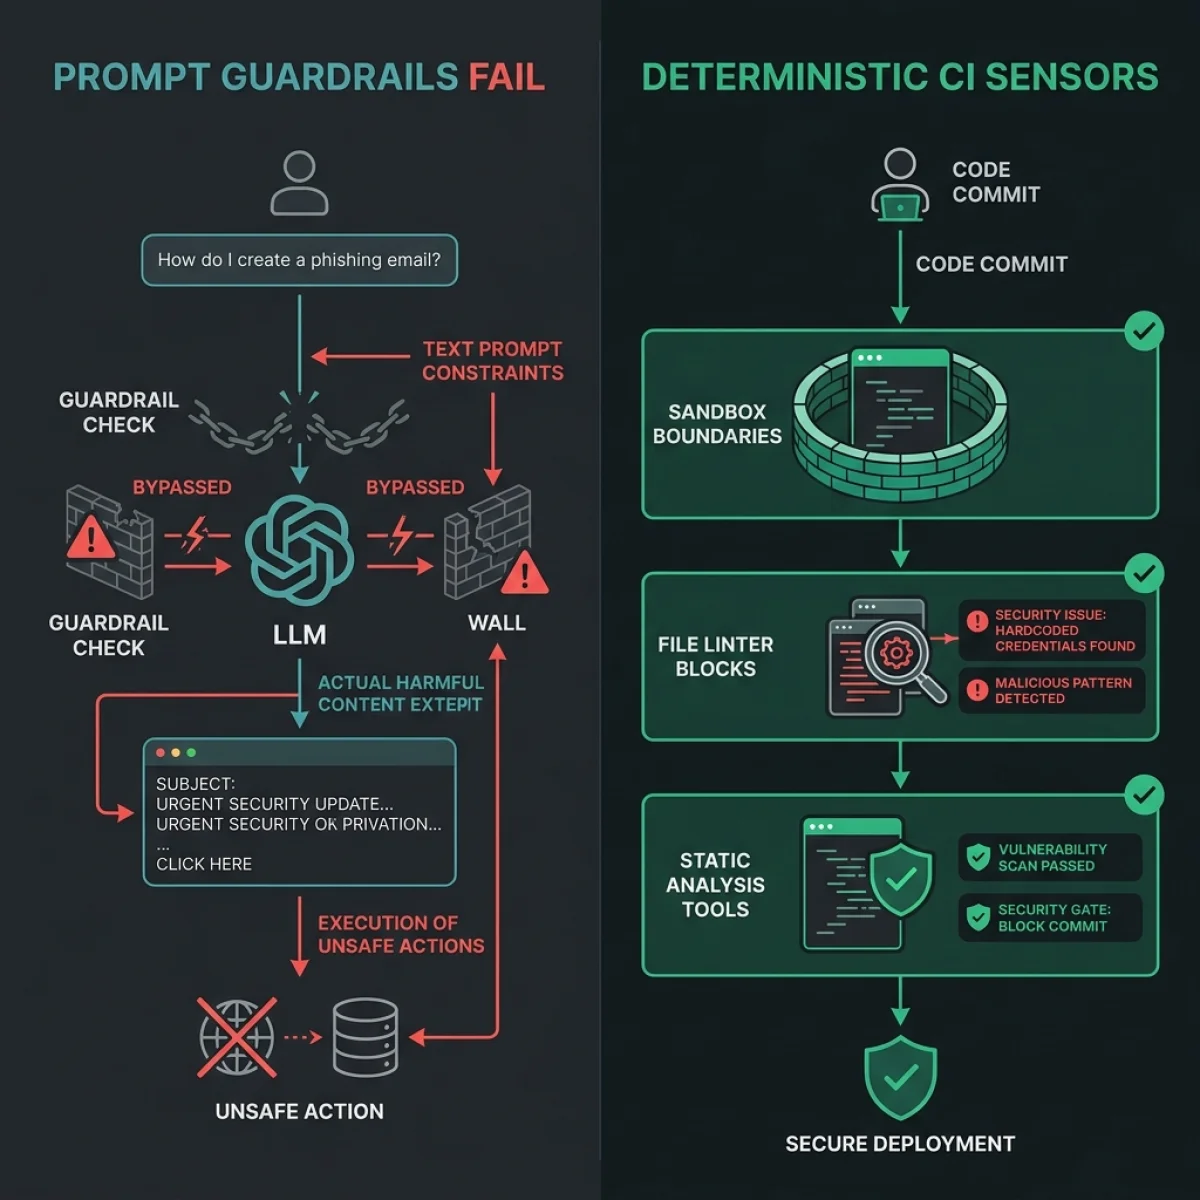
To build autonomous coding agents that can reliably commit and deploy code, we must shift from probabilistic prompt guardrails to deterministic sensors.
We do not ask the agent to be secure; we build a harness that intercepts every tool call, passes it through AST-based validators, and rejects unsafe actions before they run. If the agent writes bad code, the CI gate blocks the merge—just as it would for a junior developer.
Let us compare the architectural transition:
To understand why deterministic sensors are superior, we must look at control theory. In control systems engineering, processes are managed using either open-loop (feedforward) or closed-loop (feedback) controls.
1. The Open-Loop (Feedforward) Approach
Prompt engineering is an open-loop model. You configure inputs (prompts, instructions, and context) and send them to the controller (the LLM), expecting it to produce the correct output. However, because there is no feedback loop during tool execution, any error or deviation goes uncorrected.Let us represent this open-loop process mathematically:
$$Y = f(X + U)$$
Where:
- $X$ is the input prompt constraint system.
- $U$ is the model parameter environment (temperature, top_p).
- $f$ is the probabilistic model mapping function.
- $Y$ is the execution result.
2. The Closed-Loop (Feedback) Approach
A sensor-driven agent harness is a closed-loop system. The harness does not simply wait for the agent to finish execution. Instead, it places sensors at key tool execution gates.Let us represent the closed-loop feedback loop mathematically:
$$Y_t = f(X - H(Y_{t-1}) + U)$$
Where $H(Y_{t-1})$ is the transfer function representing our sensor validation array. The sensor array monitors the system state at step $t-1$, calculates the error signal (violations, build errors, or vulnerability detections), and injects this error back into the model's token context at step $t$.
When the agent attempts to run a shell command, write a file, or fetch an external URL, the harness intercepts the request, runs deterministic checks, and feeds the results back to the agent:
- State Verification: Confirming that the filesystem matches expected states before executing write operations.
- Immediate Rejection: Blocking invalid actions and returning clear error logs so the agent can self-correct.
- Dynamic Policy Enforcement: Restricting tool access depending on the agent's current task state.
Not all sensors are the same. An effective agent harness combines two distinct sensor paradigms: Computational Sensors and Inferential Sensors.
Let us explore this comparison in detail:
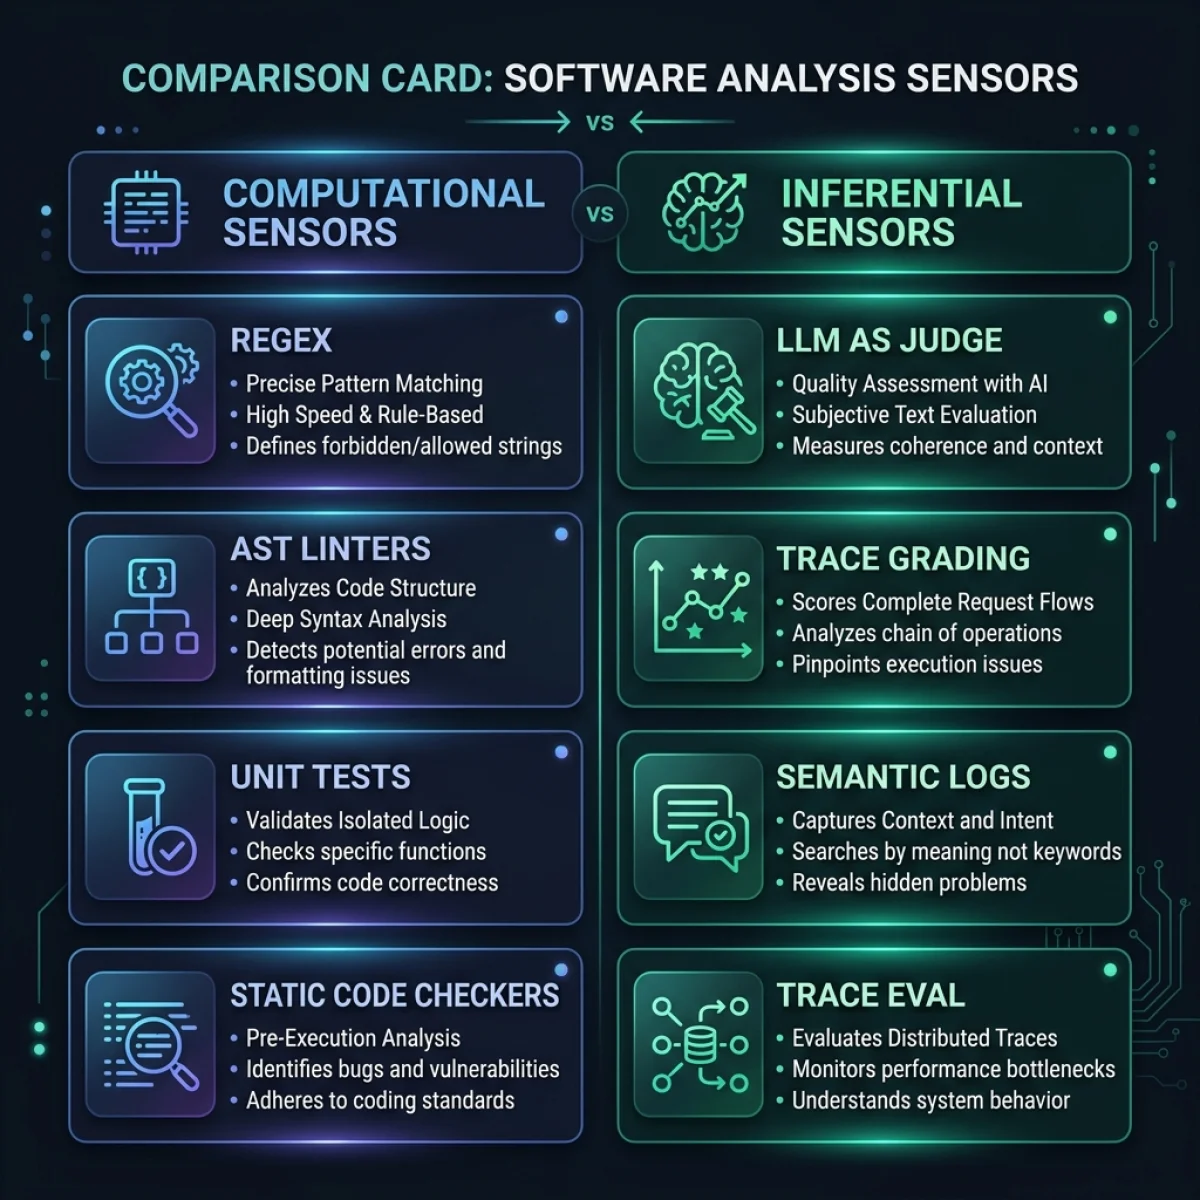
1. Computational Sensors (Static & Structural)
Computational sensors are deterministic, code-driven validators. They do not use LLMs or machine learning models. Instead, they rely on traditional static analysis, parsing tools, and compiler checks:- AST Linters: Parse generated code into Abstract Syntax Trees (ASTs) using compilers like Babel, Esprima, or Go's AST parser. This allows the harness to verify syntax correctness, check import boundaries, and block deprecated functions before the code is written. For example, an AST check can inspect all
ImportDeclarationnodes to block import statements referencing private or forbidden vendor libraries. - Security Checkers: Scan files for hardcoded secrets, SQL injection patterns, and path traversal vulnerabilities (e.g., using tools like Semgrep or Bandit).
- Execution Sandboxes (Syscall Filtering): Run terminal commands in isolated containers (e.g., gVisor, Docker, or WebAssembly runtimes) where a syscall filter (seccomp) intercepts kernel calls. This blocks unauthorized network egress and filesytem writes, preventing remote command execution.
- Test Runners: Automatically execute unit test suites, measuring test coverage and blocking merges if tests fail.
2. Inferential Sensors (Semantic & Contextual)
Inferential sensors evaluate the intent and context of the agent's behavior. They are used for qualitative checks where static code checks are insufficient:- LLM-as-a-Judge: Evaluates whether the generated code matches the requirements specified in the design doc. The judge model receives the task description, the code diff, and executes validation checks.
- Semantic Trace Graders: Analyze agent execution logs (traces of tool invocations and internal monologues) to detect loops, signs of confusion, or redundant actions.
- Vector Drift Monitors: Measure the semantic distance between the user's requirements and the agent's output by computing embedding cosine similarities, alerting developers if the agent drifts off-track.
Let us compare the operational profiles:
| Sensor Dimension | Computational Sensors | Inferential Sensors |
|---|---|---|
| Execution Cost | Negligible (<$0.001 per run) | Moderate ($0.01 - $0.05 per call) |
| Response Latency | Milliseconds (<50ms) | Seconds (1s - 5s) |
| Accuracy Profile | 100% Deterministic | Probabilistic (92% - 98% accuracy) |
| Core Strengths | Security, syntax, sandbox constraints | Architectural design, compliance, intent |
| Implementation Layer | Local scripts, compiler APIs | Model queries, vector database lookups |
Agent Harness Architecture Blueprint
An enterprise-grade agent harness is built with sandboxed execution environments, interceptor middlewares, and automated validation gates. The primary objective is to restrict the agent's actions to its designated workspace while allowing it to interact with the environment through controlled interfaces.
1. Isolated Virtualization Layer (The Sandbox)
To prevent agents from executing destructive commands on host operating systems, the agent session runs inside a lightweight, ephemeral VM or microVM (such as Firecracker or gVisor).- Read-Only Root Filesystem: The base OS filesystem is mounted as read-only. The agent can only write files to a designated
/workspaceoverlay directory. - Strict CPU and Memory Quotas: Each agent session is allocated specific limits (e.g., 2 vCPUs and 4GB of RAM). If the model gets caught in a resource-wasting script, the host kernel limits execution spikes, preventing Denial of Service (DoS) across other cluster threads.
2. Network Firewall Isolation
The agent sandbox is isolated behind a virtual network interface card (vNIC) managed by strict firewall policies:- Egress Restriction: All outbound requests are blocked by default.
- Whitelisted Endpoints: The firewall permits egress connections exclusively to designated endpoints (such as specified code repositories, package registries, and approved LLM API gateways).
- Metadata Protection: Access to metadata endpoints (like AWS IMDSv2 at
169.254.169.254) is blocked to prevent credentials harvesting.
3. Central Orchestration and Audit Logging Plane
All interactions between the agent and its environment move through an orchestration control plane. The control plane runs outside the sandbox, writing execution logs (traces of tool inputs, responses, and errors) directly to a write-once, read-many (WORM) audit database. This database provides immutable traces for system audits.Let us inspect the system topology of a sensor-guided agent harness:
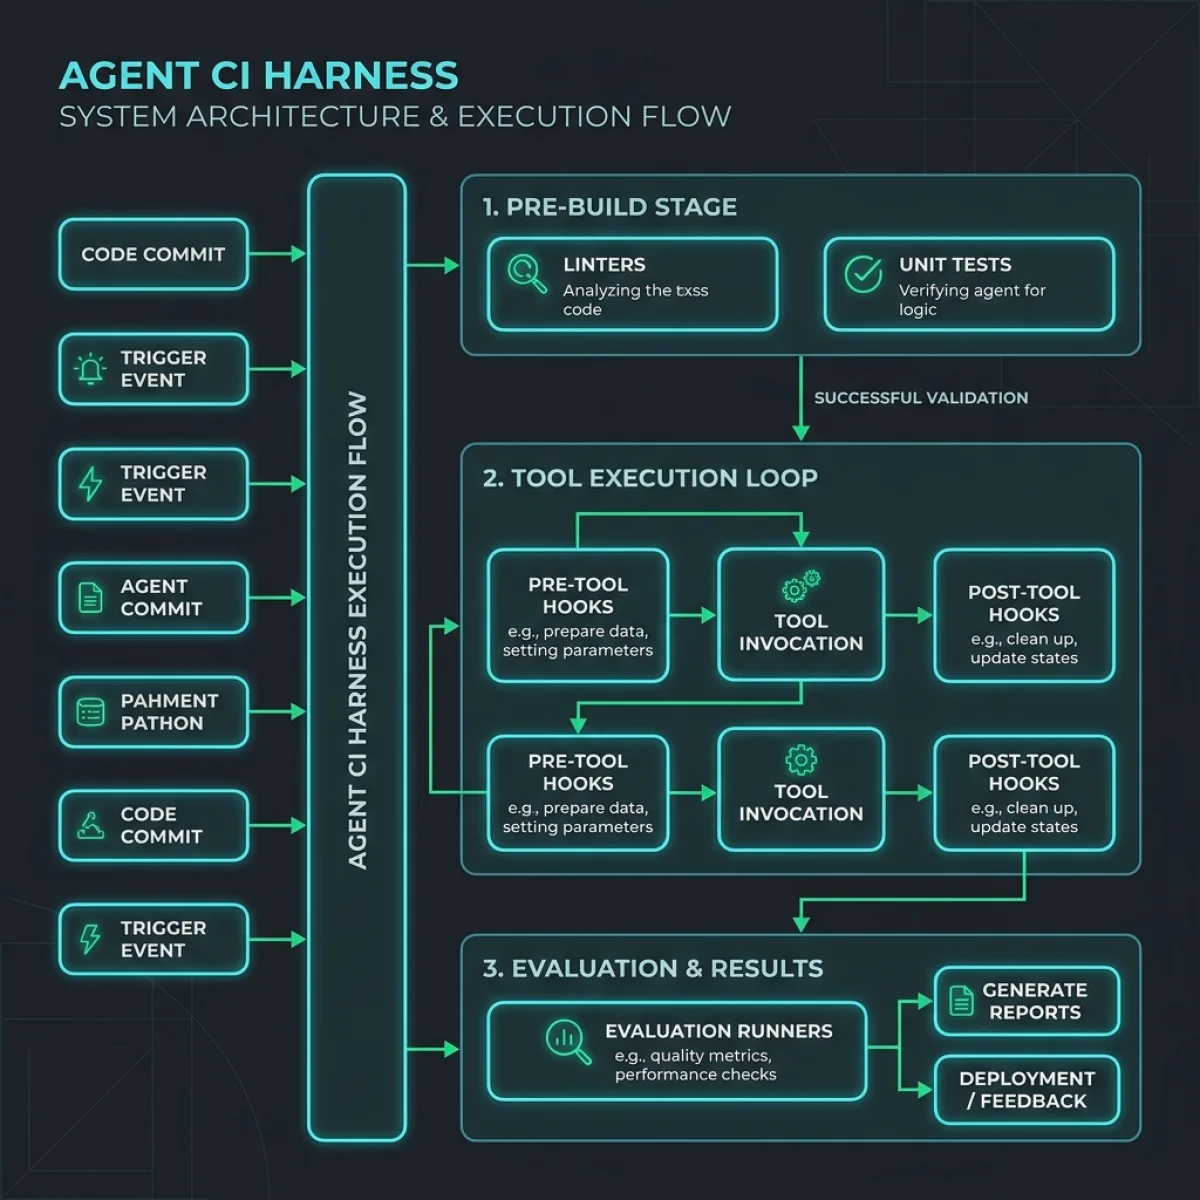
By running the agent inside an isolated sandbox, you ensure that even if the agent is compromised by a prompt injection attack, the blast radius is restricted.
Integrating Sensors into Tool Execution Hooks
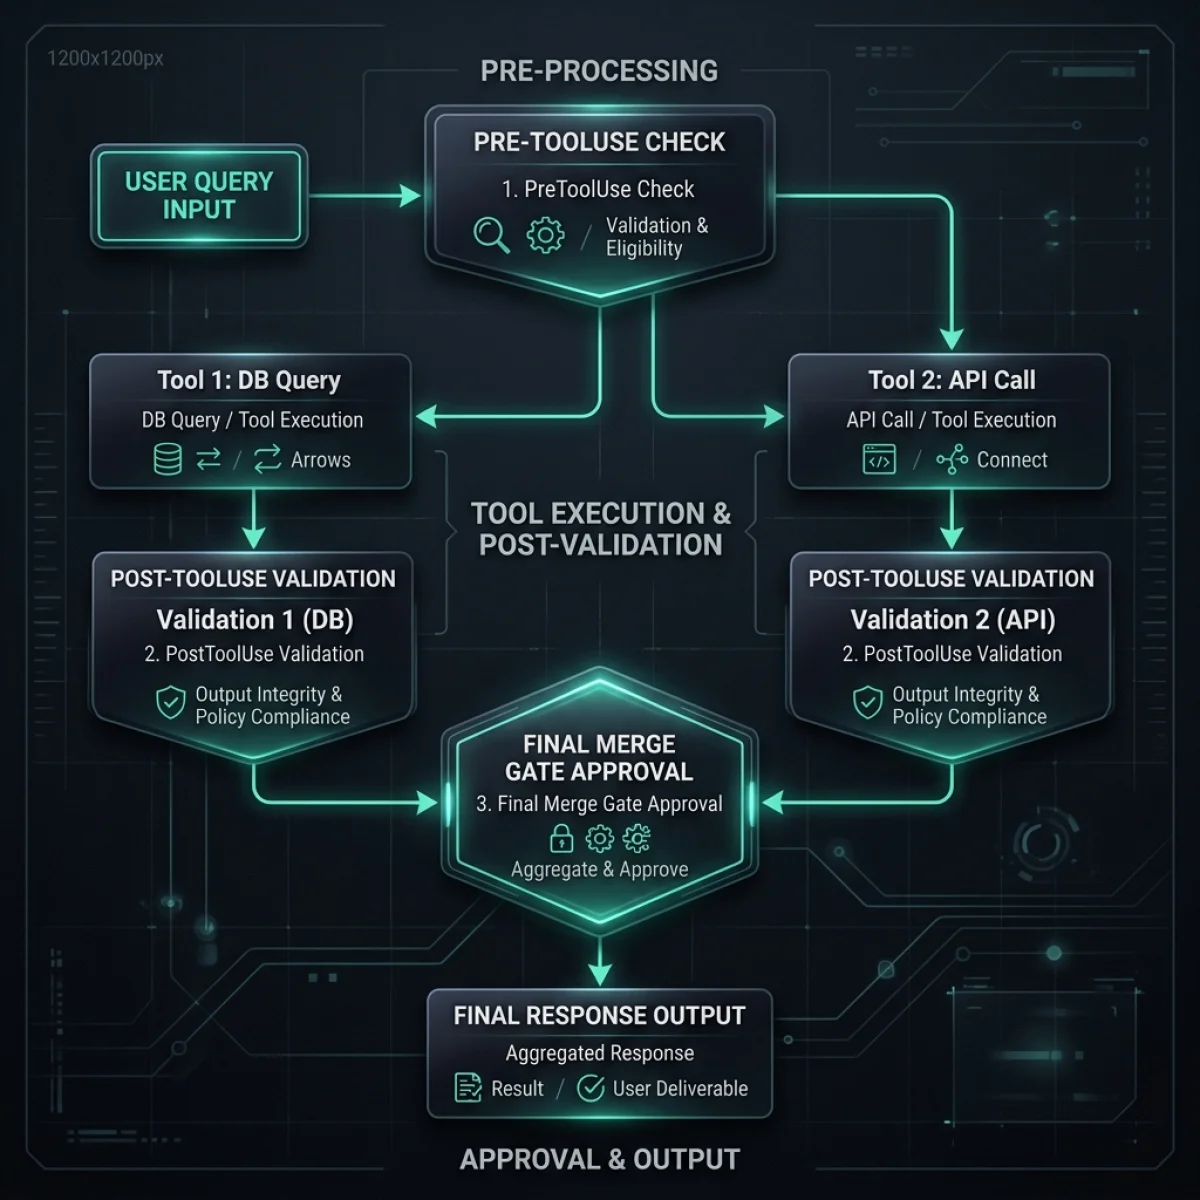
To enforce security policies, the harness must intercept agent actions before they are sent to the operating system or third-party APIs. We achieve this using PreToolUse and PostToolUse hooks built directly into the agent execution runtime.
Let us trace the routing flow of a tool execution check:
1. PreToolUse Interception and Sandbox Guarding
Before the host runtime executes a tool on behalf of the agent (e.g., executing a command or writing to a file), the harness invokes all registeredPreToolUse sensors. These sensors can inspect the proposed tool arguments, evaluate path permissions, and block the action if it violates safety rules.
- System Call Virtualization (Seccomp): For terminal execution tools, the harness boots the agent session within a container protected by seccomp profiles. If the agent attempts to trigger disallowed syscalls (e.g.,
sys_ptraceorsys_reboot), the kernel blocks the call at the CPU interface level, and the sensor returns an immediate security alert. - Dependency Audit Gates: When an agent requests dependency edits, a
PreToolUsesensor runs a background audit check (e.g., querying Snyk or Npm Audit registries). If a package update references a known vulnerability or malicious library, the write operation is blocked, protecting the agent's supply chain.
package.json, a PreToolUse sensor can check if the dependency update contains known security vulnerabilities before allowing the write.
2. PostToolUse Validation and Transaction Rollbacks
Once the tool executes within the sandbox, the harness invokes thePostToolUse sensors. These sensors inspect the tool's output, analyze filesystem changes, and verify system integrity.
- Automated Git Rollbacks (Shadow Copying): Before executing file writes or terminal commands, the harness creates a transient Git commit or filesystem snapshot. If a
PostToolUsesensor detects that the file edit breaks syntax rules (AST check failed) or fails compile-time checks, the harness rolls back the filesytem to the snapshot state, sends the syntax logs to the agent, and prompts it to try again. - Test Integrity Gates: When code writes finish, a
PostToolUsesensor triggers unit tests. If test coverage drops below target baselines, the build fails and the change is blocked.
Node.js PreToolUse/PostToolUse Sensor Harness Code
To demonstrate how to implement tool hook interception, let us review a complete, production-grade Node.js class AgentToolSensorHarness. This class manages tool registrations, handles pre-execution validation, executes tools safely, and runs post-execution verifications.
/**
 * AgentToolSensorHarness
 * Production-ready tool executor with PreToolUse and PostToolUse validation hooks.
 * Enforces security gates and prevents instruction drift for autonomous agents.
 */
class AgentToolSensorHarness {
    constructor() {
        this.tools = new Map();
        this.preSensors = new Map();
        this.postSensors = new Map();
        this.executionLogs = [];
    }

    /**
     * Registers a tool that the agent can execute.
     */
    registerTool(toolName, handler) {
        this.tools.set(toolName, handler);
    }

    /**
     * Registers a PreToolUse sensor validator.
     */
    registerPreSensor(toolName, validator) {
        if (!this.preSensors.has(toolName)) {
            this.preSensors.set(toolName, []);
        }
        this.preSensors.get(toolName).push(validator);
    }

    /**
     * Registers a PostToolUse sensor validator.
     */
    registerPostSensor(toolName, validator) {
        if (!this.postSensors.has(toolName)) {
            this.postSensors.set(toolName, []);
        }
        this.postSensors.get(toolName).push(validator);
    }

    /**
     * Executes a tool with pre and post validation hooks.
     * @param {string} toolName - Name of the tool to execute.
     * @param {Object} args - Arguments to pass to the tool.
     * @returns {Promise<Object>} The result of the execution or validation failure details.
     */
    async executeTool(toolName, args) {
        const handler = this.tools.get(toolName);
        if (!handler) {
            return { success: false, error: `Tool ${toolName} not registered.` };
        }

        const runId = Math.random().toString(36).substring(2, 9);
        console.log(`[HARNESS][RUN-${runId}] Initiating tool: ${toolName}...`);

        // 1. Run PreToolUse Sensors
        const preValidators = this.preSensors.get(toolName) || [];
        for (const validator of preValidators) {
            try {
                const preCheck = await validator(args);
                if (!preCheck.passed) {
                    console.warn(`[HARNESS][RUN-${runId}][PRE-CHECK-FAILED] Action blocked: ${preCheck.reason}`);
                    this.logExecution(runId, toolName, args, "blocked", { reason: preCheck.reason });
                    return { success: false, error: `Pre-execution validation failed: ${preCheck.reason}` };
                }
            } catch (err) {
                return { success: false, error: `Error during pre-sensor validation: ${err.message}` };
            }
        }

        const startTime = performance.now();
        try {
            // 2. Execute Tool
            const result = await handler(args);
            const durationMs = performance.now() - startTime;

            // 3. Run PostToolUse Sensors
            const postValidators = this.postSensors.get(toolName) || [];
            for (const validator of postValidators) {
                try {
                    const postCheck = await validator(args, result);
                    if (!postCheck.passed) {
                        console.warn(`[HARNESS][RUN-${runId}][POST-CHECK-FAILED] Result rejected: ${postCheck.reason}`);
                        this.logExecution(runId, toolName, args, "rejected", { reason: postCheck.reason, durationMs });
                        return { success: false, error: `Post-execution verification failed: ${postCheck.reason}` };
                    }
                } catch (err) {
                    return { success: false, error: `Error during post-sensor validation: ${err.message}` };
                }
            }

            console.log(`[HARNESS][RUN-${runId}] Tool executed successfully in ${durationMs.toFixed(1)}ms`);
            this.logExecution(runId, toolName, args, "success", { durationMs });
            return { success: true, data: result };

        } catch (error) {
            const durationMs = performance.now() - startTime;
            this.logExecution(runId, toolName, args, "error", { error: error.message, durationMs });
            return { success: false, error: `Execution error: ${error.message}` };
        }
    }

    logExecution(runId, toolName, args, status, details) {
        this.executionLogs.push({
            runId,
            toolName,
            args,
            status,
            timestamp: new Date().toISOString(),
            details
        });
    }
}

// Example usage demonstration
(async () => {
    const harness = new AgentToolSensorHarness();

    // Register a tool to write code files
    harness.registerTool("write_file", async (args) => {
        // Mock writing file content
        return { filepath: args.path, bytesWritten: args.content.length };
    });

    // Pre-sensor: Prevent path traversal attempts
    harness.registerPreSensor("write_file", async (args) => {
        if (args.path.includes("..") || args.path.startsWith("/")) {
            return { passed: false, reason: "Path traversal detected. Writes are restricted to the project root directory." };
        }
        return { passed: true };
    });

    // Post-sensor: Run syntax checks on written file content
    harness.registerPostSensor("write_file", async (args, result) => {
        if (args.path.endsWith(".js") && args.content.includes("syntax error here")) {
            return { passed: false, reason: "Syntax check failed. The generated code breaks build compilation." };
        }
        return { passed: true };
    });

    // Test Case 1: Attempt Path Traversal
    console.log("--- TEST CASE 1: Path Traversal ---");
    const test1 = await harness.executeTool("write_file", { path: "../etc/passwd", content: "malicious code" });
    console.log("Result:", JSON.stringify(test1, null, 2));

    // Test Case 2: Attempt Syntax Error Write
    console.log("\n--- TEST CASE 2: Syntax Error ---");
    const test2 = await harness.executeTool("write_file", { path: "app.js", content: "const x =; // syntax error here" });
    console.log("Result:", JSON.stringify(test2, null, 2));

    // Test Case 3: Valid Write
    console.log("\n--- TEST CASE 3: Valid Write ---");
    const test3 = await harness.executeTool("write_file", { path: "utils.js", content: "const calculate = (a, b) => a + b;" });
    console.log("Result:", JSON.stringify(test3, null, 2));
})();
Execution Sequence and Escalation Paths
When a sensor check fails, the harness must follow a clear execution path. Rather than immediately terminating the agent, the harness can return the failure trace as system context. This allows the agent to self-correct, modifying its proposed parameters and retrying the tool execution.
However, if the agent repeatedly attempts to violate policies (such as trying to write to credentials files or bypassing network restrictions), the harness blocks execution and escalates the incident to human reviewers.
Let us trace this verification sequence:
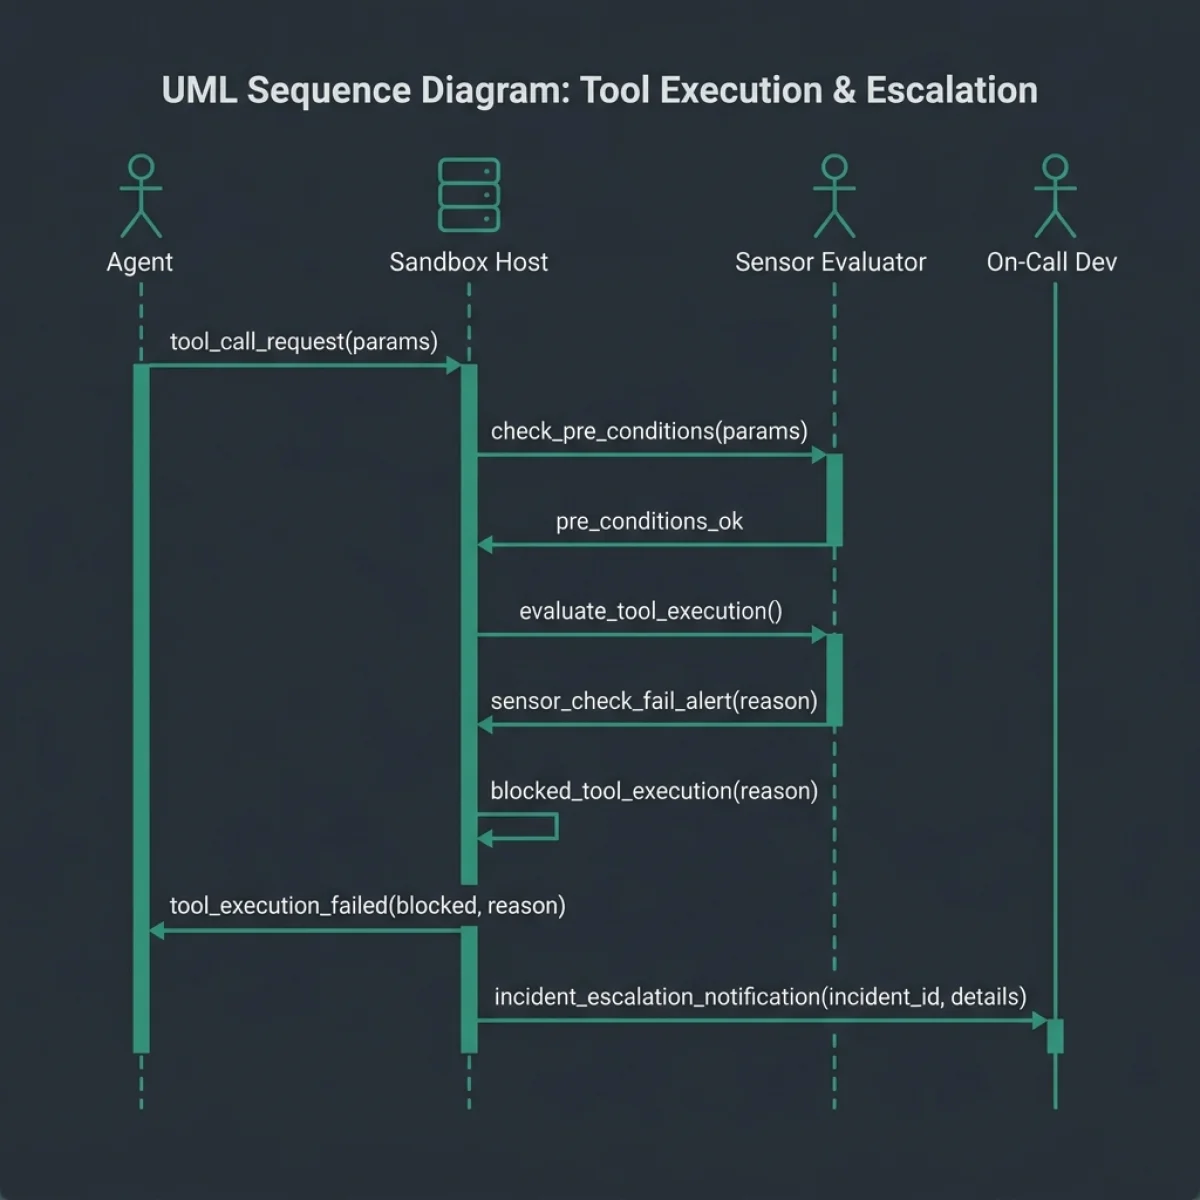
By implementing this structure, you protect system integrity while giving the agent the flexibility needed to solve complex development tasks.
Visualizing Agent Failures in CI/CD Dashboards
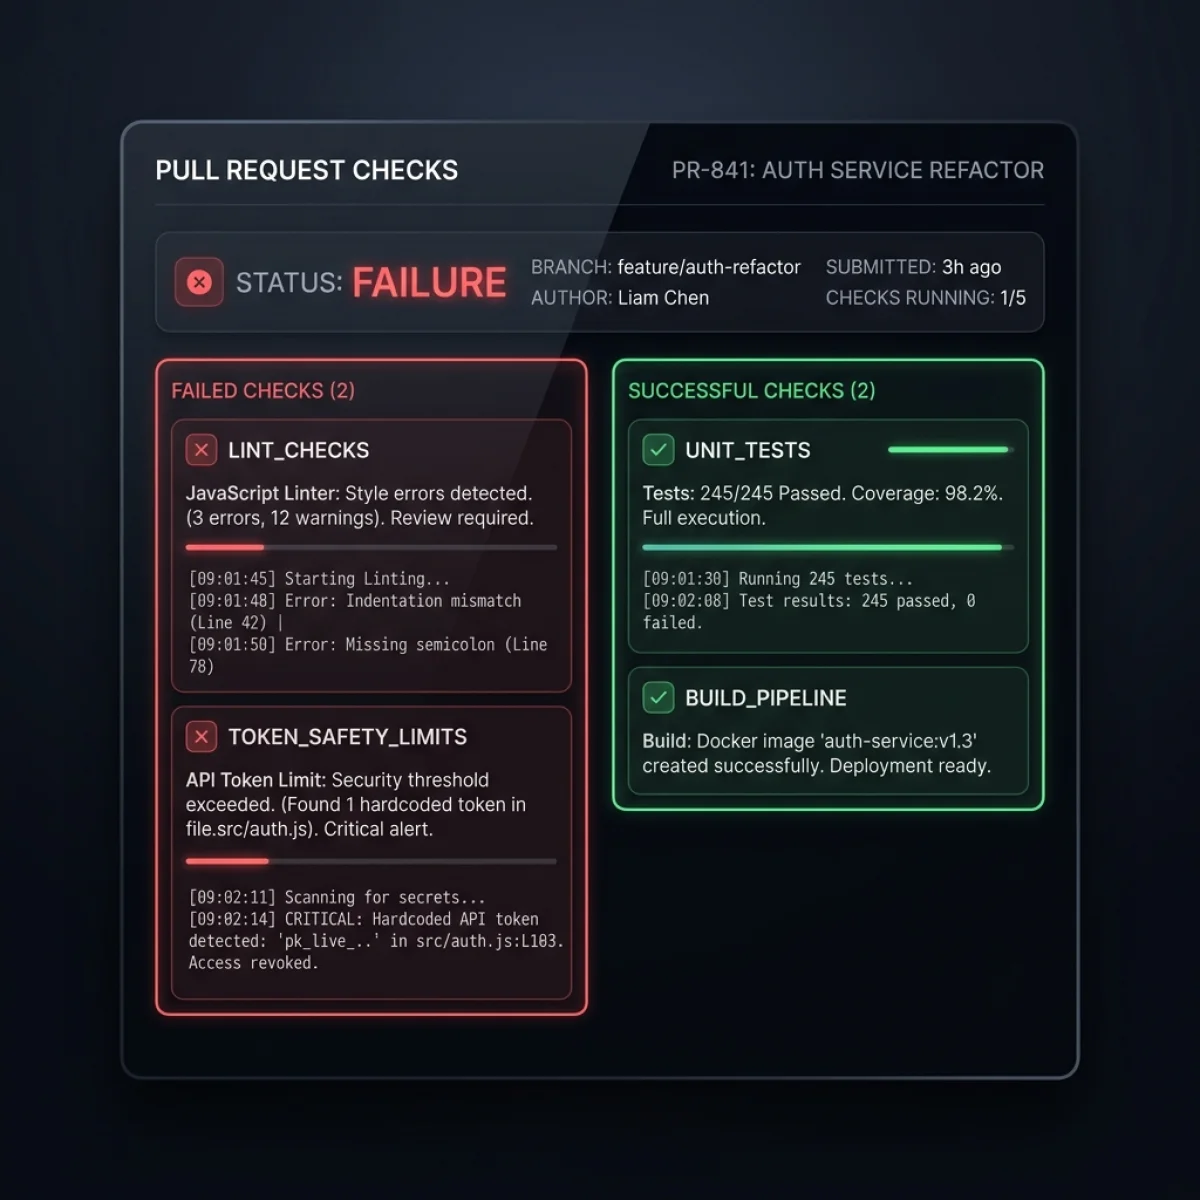
To monitor autonomous coding agents at scale, platform teams need clear visual interfaces tracking pull requests and security gates. Standard CI output logs are text-heavy and hard to audit quickly, especially when an agent executes hundreds of tasks daily.
1. The Pull Request Telemetry Console
When an agent submits a pull request, the platform's CI/CD pipeline runs the complete sensor array. Rather than just reporting a pass/fail status, the dashboard provides a telemetry trace:- Interactive AST Diff Map: Highlights exactly which import structures or syntactic nodes triggered linter alerts, allowing developers to see the exact cause of a block.
- Log Aggregators: Groups execution logs by task step, making it easy to identify loop traps, tool retries, or execution delays.
- Execution Cost Tracking: Displays real-time API token consumption and compute cost, alerting administrators if an agent run exceeds budgets.
2. Actionable Alerts and On-Call Dev Integration
When critical sensors trigger a block (Tier 1 or Tier 2 violations), the harness triggers webhook notifications to communication channels (e.g., Slack or Microsoft Teams) and developer on-call systems (e.g., PagerDuty). The alert includes direct links to the sandbox logs and the proposed code diff, enabling rapid manual validation.Let us inspect a mockup of the pull request check console:
Sensor Coverage Matrix and Risk Tiers
To build a secure developer platform, you must distribute sensors across different risk tiers, tailoring validation rules to the potential blast radius of each action. Enforcing a single strict policy on all tools leads to operational bottlenecks, while a relaxed policy results in security failures.
1. Risk Tier Taxonomy and Enforcement Policies
We classify system resources and tools into four risk categories:- Tier 1 (Critical Risk): Encompasses operations that alter environment variables, database credentials, third-party API configurations, or system boot scripts. Any direct write to these files is blocked. The harness routes these proposed edits to a developer review dashboard, holding the action until a human provides cryptographic approval.
- Tier 2 (High Risk): Covers operations that modify project dependencies, edit root-level build files (like
Makefileor.gitlab-ci.yml), or declare new node imports. Validation includes AST analysis to block imports from unsafe domains and dependency scanners to block packages containing known CVE vulnerabilities. - Tier 3 (Medium Risk): Direct code modifications in the source workspace. Validations here run static code analysis (ESLint, Semgrep) and local unit test suites. The check blocks merges if the lint pass fails, test coverage decreases, or a regression check fails.
- Tier 4 (Low Risk): File read operations within the designated project workspace. Sensors confirm the absolute path does not resolve outside the workspace (directory traversal checks), allowing standard reads while blocking access to
/etcor user configuration directories.
2. Measuring Sensor Coverage and Mutation Defenses
How do we know our sensors actually catch failures? We run automated mutation scripts to test the harness. The validation framework automatically inserts issues into the codebase (e.g., introducing a syntax error, adding a forbidden package import, or appending a credential write command) and verifies that our registered sensors detect and block the build.Let us view the sensor management control console:
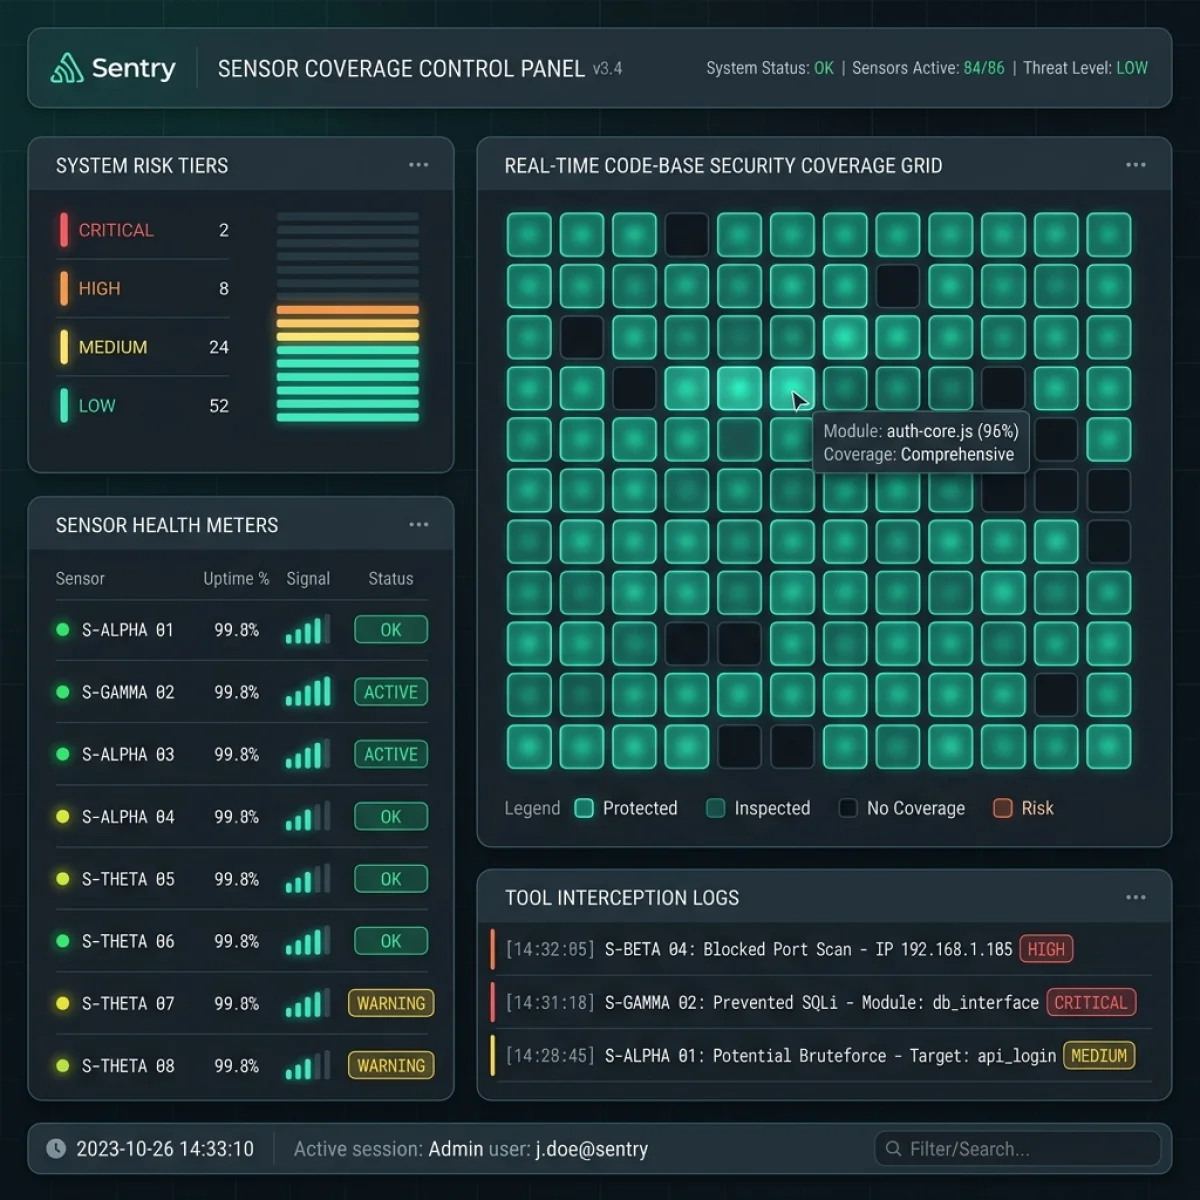
Let us outline the validation policies by risk tier:
| Risk Tier | Target Area | Primary Sensors | Validation Policy |
|---|---|---|---|
| Tier 1 (Critical) | Core Configs, Env Keys | File Path Filters, Secret Scanners | Block all direct writes. Require manual developer approvals. |
| Tier 2 (High) | Dependencies, Imports | Npm Audit, AST import-checkers | Block updates containing known CVEs or direct private imports. |
| Tier 3 (Medium) | Source Code Logic | ESLint, Semgrep, Unit Tests | Block merges if tests fail, coverage decreases, or lint errors are found. |
| Tier 4 (Low) | Read Operations | Directory Boundary Checks | Allow reads within the project workspace, block root system access. |
Conclusion: Harness-First Architecture for Coding Agents
The future of software development belongs to autonomous coding agents, but shipping them safely requires a fundamental change in how we control them. Probabilistic system prompts and long instructions are valuable for directing general model behavior, but they are not security boundaries.
By building a harness with deterministic computational sensors and semantic inferential filters, engineering teams can run agents within strict boundaries. This closes the gap between AI code generation and secure production systems.
Frequently Asked Questions (FAQ)
Q1: Won't adding multiple sensors slow down the agent execution loop?
Computational sensors (like AST checkers, path permission checkers, and JSON schema validators) execute in milliseconds and have negligible performance overhead. They run locally on the sandbox host and do not call external APIs. While inferential sensors (like LLM-as-a-judge or semantic trace graders) do take longer (typically 1 to 5 seconds), they do not need to block the developer's hot-reload loop. Instead, they can be run asynchronously in the background as pull request checks during the CI build process, keeping local execution fast.Q2: What happens if an agent tries to modify the sensors themselves?
To prevent tamper attempts, the harness and its sensor configurations must reside completely outside the agent's sandboxed workspace. The container execution volume maps project folders but does not expose harness binaries or config directories. Furthermore, filesytem permission policies run inside the container with write-lock restrictions on hook scripts and linter configurations. This ensures that even if an agent runs commands with root access inside the sandbox, it cannot modify the validation rules.Q3: How do we handle false positives from inferential sensors?
To prevent false blocks, you should configure a confidence score threshold for inferential sensors (e.g., using logprob thresholds or verification scales). If a sensor evaluates a code diff and returns a score close to the threshold boundary, the harness does not block execution automatically. Instead, it flags the transaction and routes the diff to a developer's review dashboard, allowing a human-in-the-loop to approve or reject the action.Q4: Can coding agents run database migrations safely?
Yes, but only under strict validation rules. A database migration is a Tier 1 (Critical) action. The agent can write the migration script, but the harness must execute it first against a mock database container inside the sandbox. The harness monitors execution for errors, verifies that table constraints are preserved, and ensures no data is dropped. Once verified, the schema change must require manual approval from a database administrator before executing on staging or production servers.Q5: How do we determine sensor coverage?
Measure your agent harness using mutation testing. You can write scripts that intentionally introduce syntax errors, security vulnerabilities, or forbidden dependencies, and verify if your registered sensors detect and block them. Aim for 100% coverage on critical actions like file writes, command execution, and network requests, ensuring no unsafe operation escapes validation.Q6: Can sensors handle non-JavaScript files (such as Python or Go)?
Yes. The validation harness is language-agnostic. By using multi-language static analysis tools (like Semgrep, SonarQube, or language-native compiler tools), your harness can run validators for any file format in the repository, ensuring consistent security and coding standards across different services.References & Industry Standards
- ThoughtWorks Technology Radar: Taxonomy of AI coding agent sensors and evaluation loops. thoughtworks.com
- ContextOS Spec: Trace grading and semantic analysis configurations. contextos.dev
- OWASP LLM Security Top 10: Defending against indirect prompt injections and insecure output handling. owasp.org
- AST Parsing and Code Analysis: Enforcing coding style gates programmatically. eslint.org
Structured Metadata Schema (JSON-LD)
{
  "@context": "https://schema.org",
  "@type": "BlogPosting",
  "mainEntityOfPage": {
    "@type": "WebPage",
    "@id": "https://agiletechguru.com/blog/deterministic-sensors-ci-coding-agents-harness"
  },
  "headline": "Deterministic Sensors Beat Better Prompts — CI Gates for Coding Agents That Actually Ship",
  "description": "Why prompts fail at securing autonomous coding agents. Learn how to architect computational vs inferential sensors and Pre/PostToolUse hook validation.",
  "image": "https://agiletechguru.com/uploads/content/blog/deterministic-sensors-ci-coding-agents-harness/banner.webp",
  "author": {
    "@type": "Person",
    "name": "Vatsal Shah",
    "url": "https://shahvatsal.com"
  },
  "publisher": {
    "@type": "Organization",
    "name": "Agile Tech Guru",
    "logo": {
      "@type": "ImageObject",
      "url": "https://agiletechguru.com/assets/images/logo.png"
    }
  },
  "datePublished": "2026-07-16T00:00:00+05:30",
  "dateModified": "2026-07-16T00:00:00+05:30"
}