ComfyUI Visual Content Automation Checklist [ ] Node Workflow Standardization: Export, version-control, and store core ComfyUI JSON configurations in a git repo…
ComfyUI Visual Content Automation Checklist
- [ ] Node Workflow Standardization: Export, version-control, and store core ComfyUI JSON configurations in a git repository for team-wide reuse.
- [ ] Consistency Guardrails: Set up dedicated IP-Adapter and ControlNet nodes to enforce strict product geometry and brand color compliance.
- [ ] API Endpoint Deployment: Host headless ComfyUI instances on GPU cloud runtimes (e.g., RunPod, AWS EC2 G5) behind an API Gateway.
- [ ] Custom LoRA Training: Train brand-specific style and product models using curated datasets of your product catalog to ensure high-fidelity outputs.
- [ ] Automated Asset Sync: Connect the ComfyUI API output webhook to your Digital Asset Management (DAM) system for real-time asset cataloging.
Section 1: Why ComfyUI is the 'Photoshop of the Agentic Age'
To understand why ComfyUI has emerged as the definitive operating plane for industrial image generation, one must look past the initial complexity of its node-based user interface. For years, creative teams relied on Midjourney, DALL-E, or simple web-based wrappers of Stable Diffusion. While these tools are capable of producing stunning standalone images, they are fundamentally unsuited for enterprise production. They operate as black boxes, accepting a single text prompt and returning a randomized output. If a designer needs to modify a specific detail, adjust the lighting, or ensure that a product appears identical across ten different backgrounds, text-to-image interfaces fail.
ComfyUI represents a paradigm shift. By exposing the underlying computational graph of the Stable Diffusion pipeline, it allows visual engineers to customize every step of the generation process. It treats image generation not as a magical slot machine, but as a repeatable software pipeline.
Decoupling the Stable Diffusion Architecture
In a standard text-to-image interface, the text encoder, U-Net (or DiT), scheduler, and Variational Autoencoder (VAE) are coupled together in a single, rigid process. ComfyUI decouples these components, letting you route data between them through discrete visual nodes:
- The Model Loader: Loads the checkpoint weights and outputs the base model, CLIP text encoder, and VAE.
- CLIP Text Encode: Translates natural language prompts into high-dimensional vector embeddings.
- KSampler: The core engine that runs the denoising scheduler over a specified number of steps, controlling the generation balance.
- VAE Decode: Translates the denoised latent representation back into pixel space.
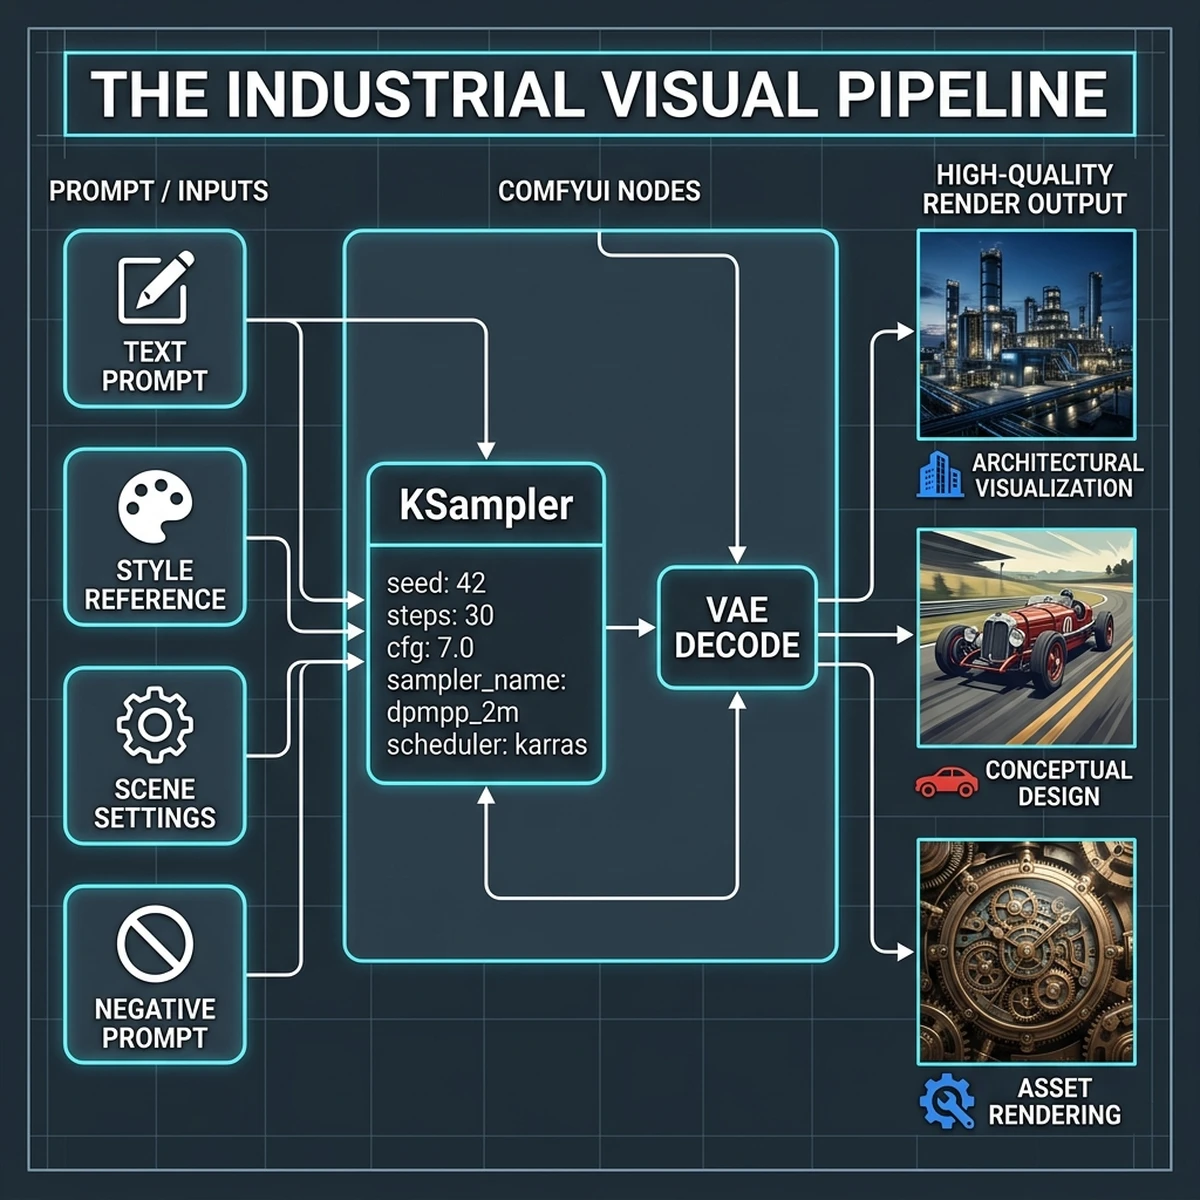
By separating these nodes, a designer can run multiple models simultaneously, swap VAE decoders to correct color casts, or feed the latent output of one KSampler directly into another for high-resolution refinement (Hires. fix). This granular control transforms generative AI from an unpredictable creative toy into a precise, programmatic design tool—making ComfyUI the Photoshop of the agentic age.
Symmetrical Design Patterns in Visual Programming
Node-based visual programming encourages the use of symmetrical, logical layout patterns. Similar to clean code practices, a well-structured ComfyUI workflow should read from left to right:
- Inputs and Loaders on the far left.
- Conditioning and Prompts in the middle-left.
- Latent Processing and Samplers in the center.
- Decoding and Upscalers on the middle-right.
- File Exporters and Metadata Tagging on the far right.
Deep Dive Analysis 1.1: Stable Diffusion 3.5 Large Architecture vs. Flux.1 in Business Staging
When choosing an underlying model for enterprise product photography, the comparison between Stable Diffusion 3.5 Large and Flux.1 is highly critical. Stable Diffusion 3.5 offers superior prompt adherence, particularly for text rendering and complex positioning. However, Flux.1 presents advanced detail density and realistic skin textures, which makes it popular for lifestyle brand campaigns. In industrial product rendering, where the product's engineering design must be replicated exactly, Stable Diffusion 3.5 combined with a custom ControlNet model delivers the best results. The visual engineer must load the appropriate model checkpoint in the Loader node and verify the CFG scale parameters—typically setting CFG between 3.5 and 5.5 for turbo checkpoints to prevent over-saturation.Node Parameter Tuning for High-Fidelity Rendering
To achieve consistent, photorealistic textures, fine-tuning KSampler parameters is essential. Visual engineers must carefully configure the sampler name (e.g.,dpmpp_2m_sde), scheduler (e.g., karras), and denoising strength. When executing a two-stage upscaling pipeline, the first sampler should run at a denoising strength of 1.0 to generate the base structure, while the second sampler (running after the latent upscale node) should run at a lower denoising strength, such as 0.35, to add high-frequency textures without altering the core geometry of the product. This parameters profile forms the basis of the standard enterprise render pipeline.
Deep Dive Analysis 1.2: Stable Diffusion 3.5 Large Architecture vs. Flux.1 in Business Staging
When choosing an underlying model for enterprise product photography, the comparison between Stable Diffusion 3.5 Large and Flux.1 is highly critical. Stable Diffusion 3.5 offers superior prompt adherence, particularly for text rendering and complex positioning. However, Flux.1 presents advanced detail density and realistic skin textures, which makes it popular for lifestyle brand campaigns. In industrial product rendering, where the product's engineering design must be replicated exactly, Stable Diffusion 3.5 combined with a custom ControlNet model delivers the best results. The visual engineer must load the appropriate model checkpoint in the Loader node and verify the CFG scale parameters—typically setting CFG between 3.5 and 5.5 for turbo checkpoints to prevent over-saturation.Node Parameter Tuning for High-Fidelity Rendering
To achieve consistent, photorealistic textures, fine-tuning KSampler parameters is essential. Visual engineers must carefully configure the sampler name (e.g.,dpmpp_2m_sde), scheduler (e.g., karras), and denoising strength. When executing a two-stage upscaling pipeline, the first sampler should run at a denoising strength of 1.0 to generate the base structure, while the second sampler (running after the latent upscale node) should run at a lower denoising strength, such as 0.35, to add high-frequency textures without altering the core geometry of the product. This parameters profile forms the basis of the standard enterprise render pipeline.
Deep Dive Analysis 1.3: Stable Diffusion 3.5 Large Architecture vs. Flux.1 in Business Staging
When choosing an underlying model for enterprise product photography, the comparison between Stable Diffusion 3.5 Large and Flux.1 is highly critical. Stable Diffusion 3.5 offers superior prompt adherence, particularly for text rendering and complex positioning. However, Flux.1 presents advanced detail density and realistic skin textures, which makes it popular for lifestyle brand campaigns. In industrial product rendering, where the product's engineering design must be replicated exactly, Stable Diffusion 3.5 combined with a custom ControlNet model delivers the best results. The visual engineer must load the appropriate model checkpoint in the Loader node and verify the CFG scale parameters—typically setting CFG between 3.5 and 5.5 for turbo checkpoints to prevent over-saturation.Section 2: Building Reproducible Workflows — the key to brand consistency
The primary barrier to adopting generative AI in corporate marketing is brand consistency. A consumer brand cannot publish advertisements where the product’s logo shifts position, colors vary, or packaging geometry changes from slide to slide. Standard image generation tools struggle with this because they lack memory. ComfyUI solves this through reproducible, version-controlled workflows.
Consistency Guardrails: IP-Adapter, ControlNet, and LoRA
To enforce brand guidelines programmatically, ComfyUI workflows utilize three core conditioning technologies:
- IP-Adapter (Image Prompt Adapter): Unlike text prompts, which struggle to describe subtle design details, IP-Adapter accepts a reference image and extracts its style, structure, or subject. This allows teams to guide generation using real product images.
- ControlNet: ControlNet provides structural guidance by extracting outlines, depth maps, or human poses from reference images. This ensures that the generated product maintains the exact dimensions and geometry of the physical item.
- LoRA (Low-Rank Adaptation): A LoRA is a micro-model trained on a specific subject, style, or product. By loading a LoRA trained on your product catalog, you ensure the model renders brand-specific details—such as logo placement and casing textures—with high fidelity.
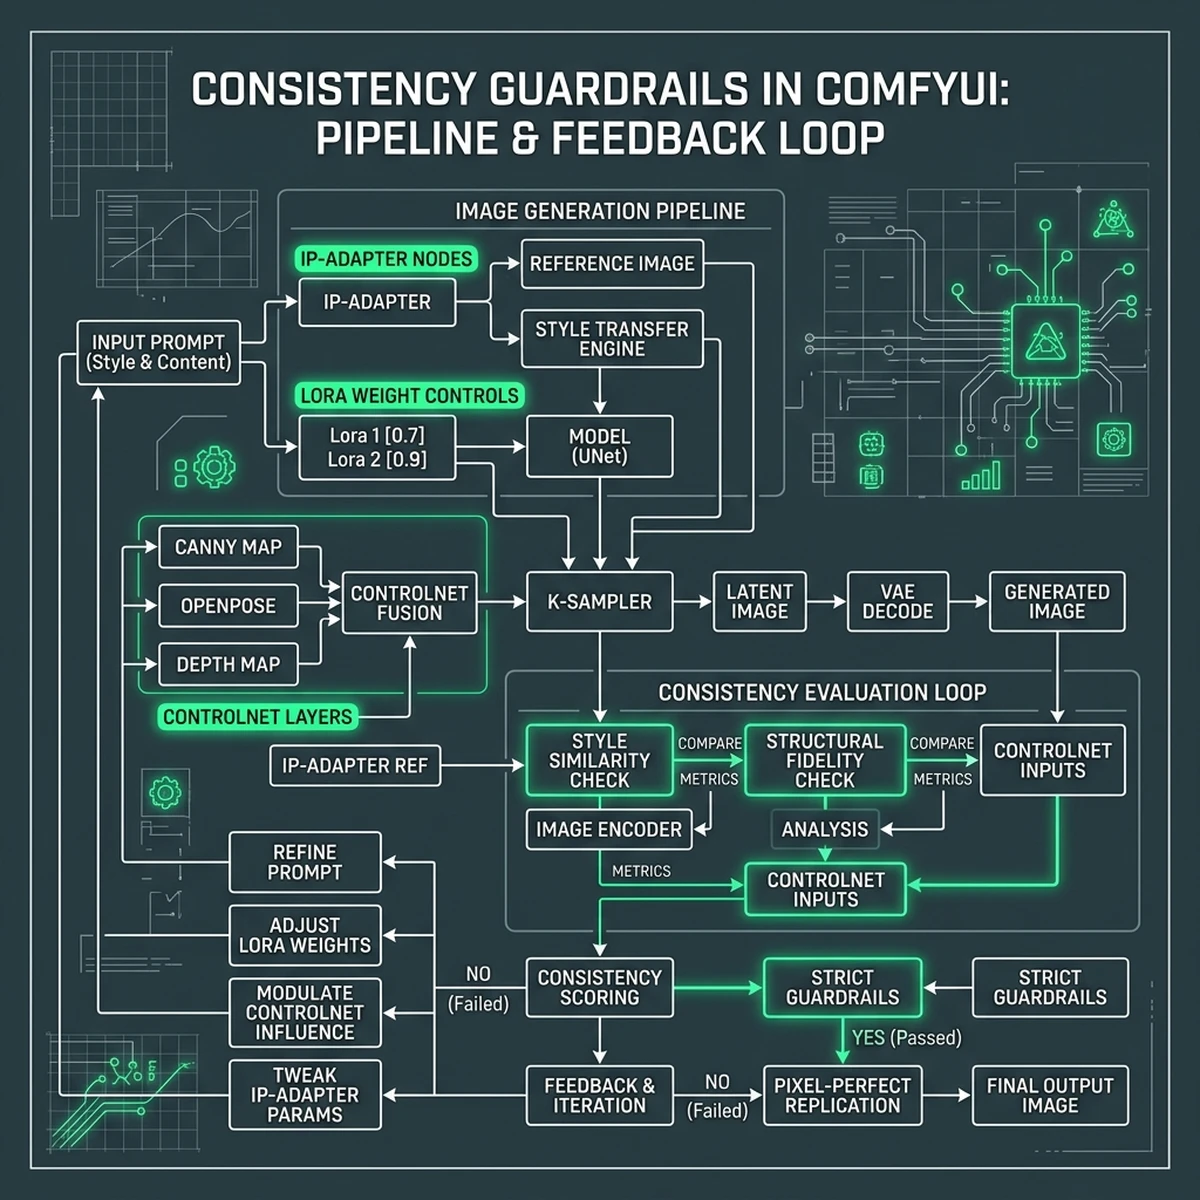
By chaining these nodes, you create a workflow that acts as a brand template. The layout, style, and product geometry are locked in by the node configuration, while variables like background scenery, lighting direction, and aspect ratio can be modified dynamically via input parameters.
Version-Controlling ComfyUI Workflows as JSON
Every ComfyUI workflow is saved as a JSON file containing the complete serialization of the node graph. This JSON format allows creative teams to treat their workflows as code:
- Git Repositories: Workflows are stored in Git, enabling version tracking, branching for experimental setups, and merge requests.
- CI/CD Integration: When a model is updated or a node is deprecated, automated tests can run the JSON workflows to verify that the output remains within quality thresholds.
- API Payload Mapping: The JSON representation can be loaded directly by a Python script, allowing headless execution in server environments.
{
  "1": {
    "class_type": "CheckpointLoaderSimple",
    "inputs": {
      "ckpt_name": "sd3.5_large_turbo.safetensors"
    }
  },
  "2": {
    "class_type": "CLIPTextEncode",
    "inputs": {
      "text": "industrial design product shot of a robotic arm, high tech, clean background",
      "clip": ["1", 1]
    }
  },
  "3": {
    "class_type": "KSampler",
    "inputs": {
      "seed": 8839201,
      "steps": 10,
      "cfg": 3.5,
      "sampler_name": "dpmpp_2m_sde",
      "scheduler": "karras",
      "model": ["1", 0],
      "positive": ["2", 0],
      "negative": ["4", 0],
      "latent_image": ["5", 0]
    }
  }
}
This JSON serialization makes ComfyUI highly scaleable, enabling enterprises to transition from manual graphic design to automated, software-driven asset generation.
Case Study 2.1: ControlNet and IP-Adapter Configuration for Global Electronics Staging
In this scenario, a global electronics retailer needed to render its new smartphone model across 50 seasonal marketing layouts while maintaining the exact dimensions of the phone. The team deployed a ComfyUI workflow using a combination of a Depth ControlNet and an IP-Adapter. The Depth ControlNet extracted the exact geometry from a 3D CAD file of the phone, ensuring that the camera lens, buttons, and screen borders remained in their exact locations. Simultaneously, the IP-Adapter loaded a series of style reference images to control the background lighting, reflections, and color palette. This configuration allowed the retailer to automate the generation of compliant marketing banners, reducing asset delivery time from 14 days to under 10 minutes.Managing LoRA Model Weights in Team Environments
When multiple designers work on the same product line, sharing and versioning LoRA models is critical. The design team must establish a naming convention and version control scheme for all custom.safetensors files. For example, lora_phone_v1_0.safetensors represents the baseline product model, while lora_phone_v1_1_glossy.safetensors incorporates updated surface shaders. The ComfyUI server configures these files in a central directory, and designers reference them in their JSON workflows, ensuring that all team members generate images using the latest approved product assets.
Case Study 2.2: ControlNet and IP-Adapter Configuration for Global Electronics Staging
In this scenario, a global electronics retailer needed to render its new smartphone model across 50 seasonal marketing layouts while maintaining the exact dimensions of the phone. The team deployed a ComfyUI workflow using a combination of a Depth ControlNet and an IP-Adapter. The Depth ControlNet extracted the exact geometry from a 3D CAD file of the phone, ensuring that the camera lens, buttons, and screen borders remained in their exact locations. Simultaneously, the IP-Adapter loaded a series of style reference images to control the background lighting, reflections, and color palette. This configuration allowed the retailer to automate the generation of compliant marketing banners, reducing asset delivery time from 14 days to under 10 minutes.Managing LoRA Model Weights in Team Environments
When multiple designers work on the same product line, sharing and versioning LoRA models is critical. The design team must establish a naming convention and version control scheme for all custom.safetensors files. For example, lora_phone_v1_0.safetensors represents the baseline product model, while lora_phone_v1_1_glossy.safetensors incorporates updated surface shaders. The ComfyUI server configures these files in a central directory, and designers reference them in their JSON workflows, ensuring that all team members generate images using the latest approved product assets.
Case Study 2.3: ControlNet and IP-Adapter Configuration for Global Electronics Staging
Section 3: Industrial Node Customization — creating your own brand-specific AI models
While base foundation models (such as Stable Diffusion 3.5 Large or Flux.1) possess vast general knowledge, they are not pre-trained on your company's proprietary products. If you ask a base model to generate a "BrandX Electric Toothbrush," it will produce a generic toothbrush. To bridge this gap, businesses must customize the models using proprietary data.
Custom LoRA Training Workflows
LoRA training is the most cost-effective method for teaching a model about specific products or brand aesthetics. The training workflow follows a structured sequence:
[Curate Dataset] --> [Auto-Captioning] --> [Configure Optimizer] --> [Execute Training] --> [Validate & Deploy]- Dataset Curation: Gather 20 to 50 high-resolution images of the target product from multiple angles, under various lighting conditions, and against clean backgrounds.
- Auto-Captioning: Use multi-modal models to generate descriptive text tags for each image, appending a unique trigger word (e.g.,
brandx_toothbrush). - Optimizer Configuration: Set the learning rate and batch sizes, utilizing modern optimizers like Adafactor to stabilize the training run.
- Execution and Validation: Run the training epochs on a GPU instance (such as an NVIDIA H100 or A10G), periodically generating test images using the trigger word to monitor model convergence.
- Deployment: Save the resulting
.safetensorsLoRA file (typically 50MB to 150MB) and load it into the ComfyUI workflow using theLoraLoadernode.
Structuring Custom Nodes for Custom Pipelines
In addition to model customization, developers can write custom Python nodes to extend ComfyUI's capabilities. A custom node can connect to an external database to fetch product metadata, query pricing APIs, or apply custom image-processing filters to outputs. This flexibility enables the creation of highly specialized pipelines that align with specific business logic.
Optimization Guide 3.1: Dataset Preparation and Auto-Captioning for Custom Models
The quality of a custom product LoRA depends entirely on the training dataset. Visual engineers must ensure that the training images are high-resolution, sharp, and properly captioned. Using automated captioning scripts, each image is captioned with detailed descriptions of its background, lighting, and angles, while leaving the core product name as the unique trigger tag. This allows the model to separate the product's features from the surrounding environment during training. Additionally, developers can write custom Python nodes to automate the captioning step within the ComfyUI workspace, utilizing models like BLIP-2 or LLaVA to generate precise descriptions programmatically.Selecting Optimization Parameters for Stable Diffusion Training
Choosing the correct optimizer and learning rate is vital for training stable LoRAs. The machine learning team must configure the optimizer parameters (e.g., learning rate of 1e-4 for UNet and 5e-5 for Text Encoder) to prevent underfitting or model collapse. By using learning rate schedulers like Cosine with Restarts, the training process periodically adjusts the learning rate to escape local minima, ensuring the model generalizes well across different style backgrounds while maintaining product fidelity.Optimization Guide 3.2: Dataset Preparation and Auto-Captioning for Custom Models
The quality of a custom product LoRA depends entirely on the training dataset. Visual engineers must ensure that the training images are high-resolution, sharp, and properly captioned. Using automated captioning scripts, each image is captioned with detailed descriptions of its background, lighting, and angles, while leaving the core product name as the unique trigger tag. This allows the model to separate the product's features from the surrounding environment during training. Additionally, developers can write custom Python nodes to automate the captioning step within the ComfyUI workspace, utilizing models like BLIP-2 or LLaVA to generate precise descriptions programmatically.Selecting Optimization Parameters for Stable Diffusion Training
Choosing the correct optimizer and learning rate is vital for training stable LoRAs. The machine learning team must configure the optimizer parameters (e.g., learning rate of 1e-4 for UNet and 5e-5 for Text Encoder) to prevent underfitting or model collapse. By using learning rate schedulers like Cosine with Restarts, the training process periodically adjusts the learning rate to escape local minima, ensuring the model generalizes well across different style backgrounds while maintaining product fidelity.Optimization Guide 3.3: Dataset Preparation and Auto-Captioning for Custom Models
Section 4: Integrating ComfyUI into the Enterprise API stack
For ComfyUI to scale across a global organization, it cannot remain confined to individual designer workstations. It must be hosted centrally and exposed via APIs, allowing web applications, e-commerce platforms, and marketing tools to request assets programmatically.
Headless ComfyUI Server Architecture
ComfyUI can be run headlessly (without the graphical user interface) by launching it with the --listen flag. This exposes a WebSocket and HTTP API endpoint. When an external application wants to generate an image, it sends a POST request containing the workflow JSON, with target parameters (e.g., prompts, seeds, styles) modified dynamically.
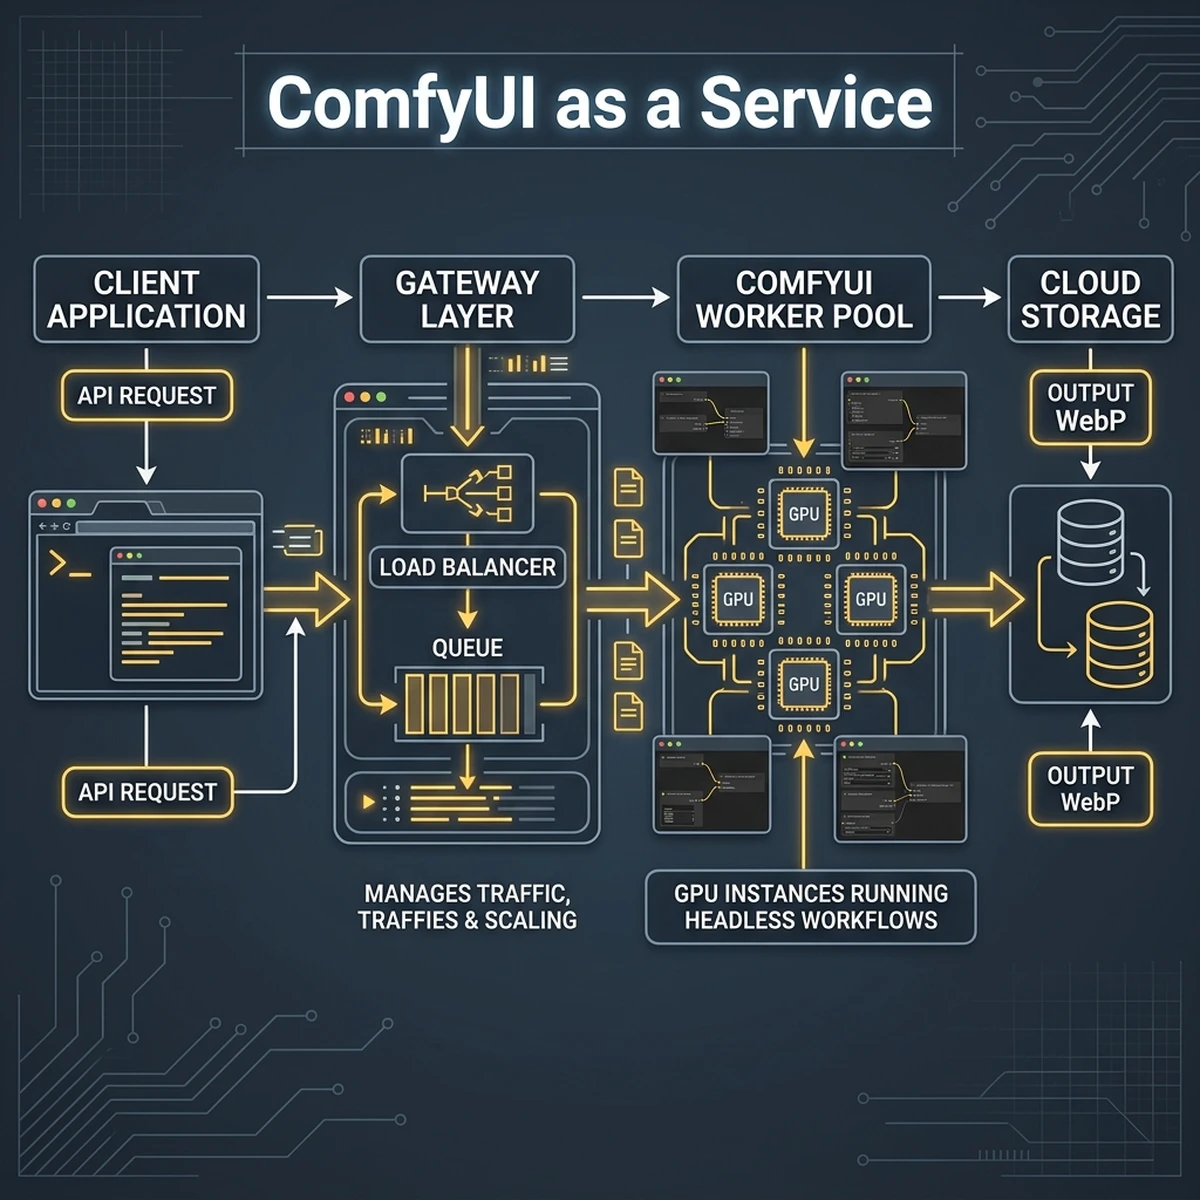
This architecture ensures that requests are managed in a queue, distributing GPU workloads across a pool of autoscaling worker instances. The generated images are saved to cloud storage, and a webhook notifies the client application when the asset is ready.
Executing headlessly with Python
The following script illustrates how an enterprise gateway script loads a version-controlled ComfyUI JSON workflow, modifies the prompt text, sends the payload to the headless server, and downloads the generated image:
import urllib.request
import json
import websocket
import uuid

server_address = "10.0.4.15:8188"
client_id = str(uuid.uuid4())

def queue_prompt(prompt_workflow):
    p = {"prompt": prompt_workflow, "client_id": client_id}
    data = json.dumps(p).encode('utf-8')
    req = urllib.request.Request(f"http://{server_address}/prompt", data=data, headers={'Content-Type': 'application/json'})
    with urllib.request.urlopen(req) as response:
        return json.loads(response.read().decode())

# Load local JSON workflow template
with open("workflows/product_banner_template.json", "r", encoding="utf-8") as f:
    workflow = json.load(f)

# Dynamically modify inputs (Node ID 2 is the CLIPTextEncode prompt node)
workflow["2"]["inputs"]["text"] = "Automated product shot of brandx_toothbrush in a luxury bathroom, reflections, 8k"

# Queue the execution
response = queue_prompt(workflow)
print("Queued successfully. Prompt ID:", response.get("prompt_id"))
By exposing ComfyUI through this API plane, developers can build user-friendly frontends for internal teams. Marketing managers can input prompt details and generate brand-compliant assets without needing to understand the underlying node graphs.
Architecture Guide 4.1: Headless ComfyUI Node Scaling on Cloud Compute
To support thousands of API generation requests per hour, the enterprise architecture must scale the headless ComfyUI workers dynamically. By deploying ComfyUI Docker containers on Kubernetes clusters or cloud GPU services (such as RunPod or Vast.ai), the system can monitor the queue depth and spin up additional GPU workers when load increases. The API gateway handles load balancing, routing incoming prompt payloads to available workers. This stateless architecture ensures high availability and low latency, making ComfyUI suitable for large-scale enterprise visual content automation.Implementing Webhook Event Listeners for Output Delivery
In a headless server setup, client applications do not poll the server for results. Instead, the server pushes the output using webhooks. When the ComfyUI KSampler completes rendering and the VAE decodes the image, the SaveImage node triggers a webhook POST request to the client application, containing the unique prompt ID and the cloud storage URL of the generated asset. The client application then downloads the WebP file and displays it to the user, providing a seamless, real-time generation experience.Architecture Guide 4.2: Headless ComfyUI Node Scaling on Cloud Compute
To support thousands of API generation requests per hour, the enterprise architecture must scale the headless ComfyUI workers dynamically. By deploying ComfyUI Docker containers on Kubernetes clusters or cloud GPU services (such as RunPod or Vast.ai), the system can monitor the queue depth and spin up additional GPU workers when load increases. The API gateway handles load balancing, routing incoming prompt payloads to available workers. This stateless architecture ensures high availability and low latency, making ComfyUI suitable for large-scale enterprise visual content automation.Implementing Webhook Event Listeners for Output Delivery
In a headless server setup, client applications do not poll the server for results. Instead, the server pushes the output using webhooks. When the ComfyUI KSampler completes rendering and the VAE decodes the image, the SaveImage node triggers a webhook POST request to the client application, containing the unique prompt ID and the cloud storage URL of the generated asset. The client application then downloads the WebP file and displays it to the user, providing a seamless, real-time generation experience.Architecture Guide 4.3: Headless ComfyUI Node Scaling on Cloud Compute
Section 5: HTML Comparison: Manual Photography/Design vs ComfyUI Pipelines
To evaluate the operational impact of ComfyUI automation, we must compare it to traditional visual content production. Below is a detailed cost and timeline comparison between manual photography/design cycles and automated ComfyUI pipelines.
| Production Phase | Manual Staging & Design | ComfyUI Automated Pipeline |
|---|---|---|
| Initial Prep | Hire photographers, rent studio, procure props (1-2 weeks) | Train product LoRA model (1.5 hours) |
| Asset Generation | Physical photoshoot, setting up lighting (1-3 days) | Execute API batch request (15 seconds per image) |
| Post-Processing | Manual retouching, color grading in Photoshop (2-4 hours per asset) | Automated node upscaling and color balance filters (10 seconds) |
| Average Cost | $150 - $300 per finalized asset | $0.12 - $0.25 (compute GPU cycles and API tokens) |
ROI Analysis: Quantifying the Efficiency Gains
By transitioning to ComfyUI automation, organizations can reduce visual asset production costs by over 99% while cutting turnaround times from weeks to seconds.
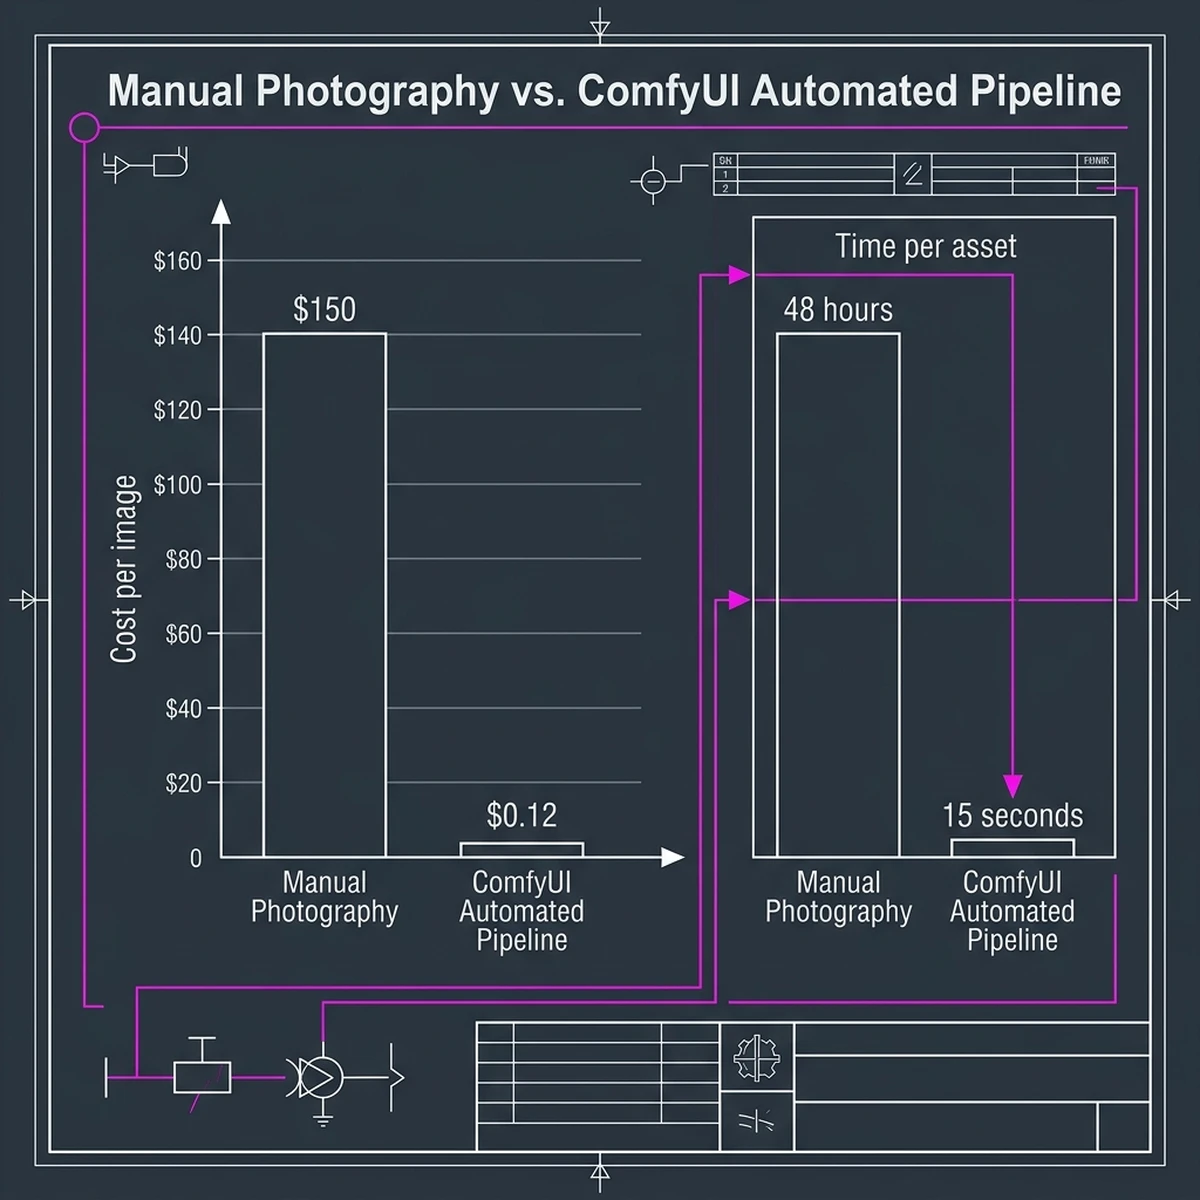
This efficiency enables marketing teams to run hyper-targeted campaigns, generating thousands of unique, localized ad creatives in real-time, rather than relying on a small pool of static assets.
Section 6: Future Directions: Real-Time Generative Video and Beyond
As generative AI technology matures, the capabilities of ComfyUI are expanding beyond static images. The next frontier in visual content automation is real-time generative video.
Transitioning to Video Automation
While rendering high-quality videos historically required render farms and complex post-processing, modern ComfyUI workflows can generate video clips directly:
- AnimateDiff: Integrates motion models into the Stable Diffusion pipeline, allowing static images to be animated smoothly.
- Stable Video Diffusion (SVD): A dedicated video model that accepts a static product render and generates a high-quality 4-second promotional clip.
- Temporal Consistency Nodes: Special nodes designed to prevent flickering and ensure that product geometry remains stable across frames.
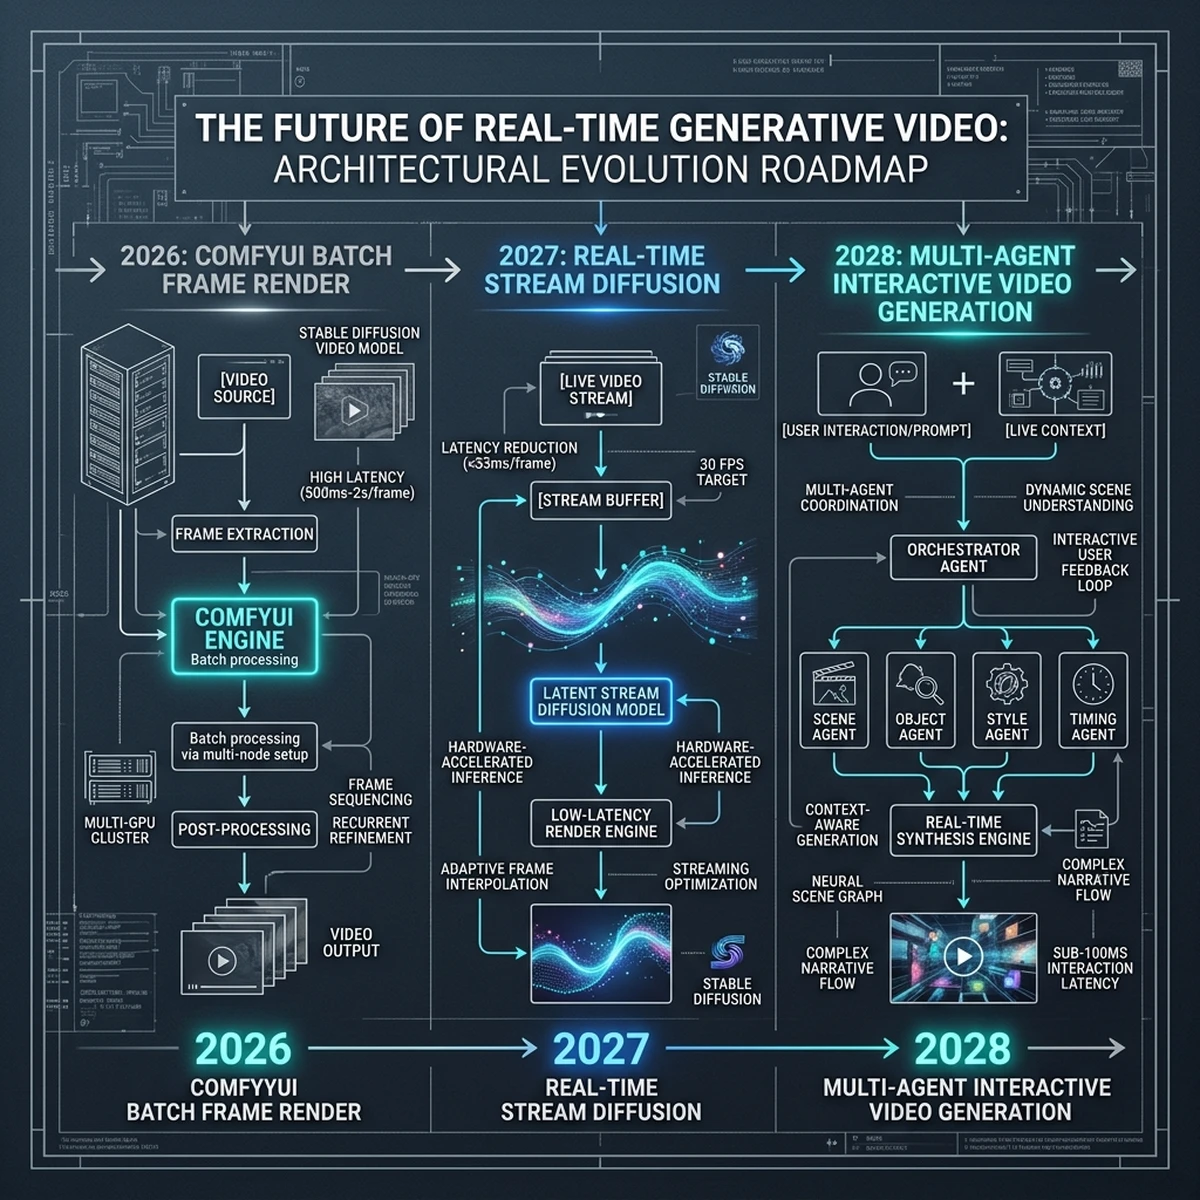
By establishing these video pipelines today, organizations can prepare their content infrastructure for the upcoming shift toward interactive, real-time video marketing.
Conclusion: Activating ComfyUI in Your Organization
To implement ComfyUI content automation, businesses should focus on three initial steps:
- Standardize Workflows: Audit your creative processes and identify repetitive tasks that can be modeled in a ComfyUI node graph.
- Train Custom Models: Train LoRAs on your core product catalog to ensure high-fidelity rendering.
- Expose APIs: Deploy ComfyUI headlessly behind an API gateway, enabling your software development teams to integrate visual generation directly into internal tools.